Installing Windows XP from disk. Simplified installation of Windows XP Install the windows xp operating system
In this article we will tell you in detail how to install Windows 7 on Windows XP. Late last year, Microsoft announced that XP would no longer be updated. In this regard, this issue remains very relevant.
What is needed for this
There are still many users who are loyal to XP. This is largely due to the fact that the “seven” is very demanding and cannot be installed on an old computer. In the era of rapid development of high technology, even software products have become very demanding.
Owners of old hardware have no choice but to use an outdated system. This allows the system to operate normally. Those users who decided to install “Seven” were sometimes dumbfounded by the terrible sluggishness of their computer.
Nevertheless, having updated their equipment, the lion's share of people immediately decide to update Windows. This allows you to take advantage of all the innovations of modern technologies.
- processor with a clock frequency of at least 1 GHz;
- 1 GB of RAM (for 32-bit) and 2 GB (for 64-bit);
- at least 16 GB of free hard disk space. If your version of Windows includes additional software (office, antivirus, drivers, etc.) you will need much more;
- Internet access (for further registration);
- a video card that is compatible with DirectX version 10 or higher;
Advice: this condition is only necessary for modern games. If you plan to use only office programs, then you can omit it.
- Some functions may require additional hardware (for example, a TV tuner or flash memory);
If you are confident that your equipment fully meets these requirements, you can proceed with installation. You can view all the parameters through the control panel, then the “system and security” item, in which we select the “system” tab.
BIOS setup
First of all, you will need to make some settings in the BIOS. To many inexperienced users, this seems like a complicated operation, but in reality everything is quite simple.
We do the following:

That's all, now the next time you start the computer, the system will start from the desired device and the installation will begin. Also in the BIOS you can immediately make additional settings, for example, increase the intensity of coolers. However, if you are not very familiar with BIOS, it is better not to do this in order to avoid mistakes.
How to install Windows 7 if you have Windows XP
Before installation, you will need to transfer all files from your computer to removable media, because it is better to install the OS by formatting the disks. If you don't have enough space, you can upload some files to a file hosting service.
Having completed all the preliminary manipulations, it’s time to begin the main procedure. Almost all the latest versions of the OS are installed automatically, so this usually does not cause difficulties even for less experienced users.
Once the installation is running, you can go do other things. The system will do everything itself, and you will only need to specify some additional parameters.
Installation process
After turning on, the computer will immediately begin installing the operating system. Almost the entire process occurs automatically, so there are usually no problems with it.

The only thing you need to do is make some settings:
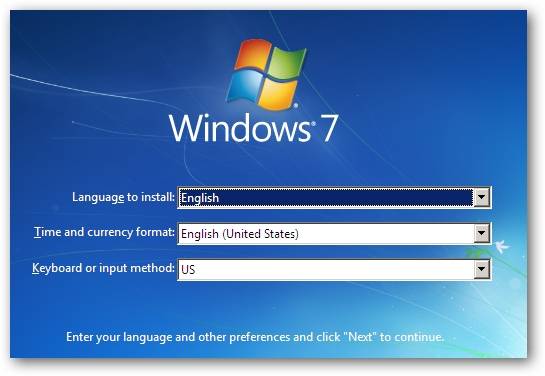
- the language in which the system will operate. However, it can always be changed through the control panel;
Important! Choose the full installation as it will save you some extra hassle
- creating partitions. You can divide the entire disk space into several parts. It is recommended to make a separate partition for Windows;

That's all. Now all you have to do is wait until the installation is complete. When finished, a window will appear in which you will need to enter your username and password (if necessary).
Some versions themselves enter the username at the end (usually the standard “Administrator”). If desired, you can edit this parameter.
If you did not format the partitions, then in one of them (most likely in C) all the XP files were saved. They need to be removed to avoid errors in the future.
This is done like this:
- Open Start and enter “Disk Cleanup” in the search menu. A list of found items will appear, among which you need to select the very first one;
- The disk selection window will appear. You need to select the one on which the previous OS was installed and click “ok”;
- in the window that opens, select “clean system files”;
- Next, you need to check the box next to “previous settings” and click “ok;
- When finished, click “delete files”;
- After a few seconds, the unnecessary folder will be deleted.
Install the drivers
Now all that remains is to install drivers for all existing devices (video card, chipset, network, sound, etc.). If you have a disk with drivers specifically for your computer (it is usually given upon purchase), then all you have to do is insert it and trust the instructions.

However, if it is missing, you will have to select drivers for all equipment.
You can do this in several ways:

Now you can judge with confidence that all the work is finished and you have completed the task. Don't forget that you will have to reinstall all software again. Therefore, get distribution kits in advance so as not to experience problems in the future.
In addition, software products that run on XP may not work on Windows 7. Therefore, before switching to this system, you should acquire more modern software products.

As you can see, this is a completely simple process and by strictly following all the instructions, you will certainly cope with it. If necessary, you can supplement the system with various additional utilities.
Probably every second computer-related website has an article about how to install Windows XP operating system. I thought that let my blog be no exception and remain on it Windows XP installation instructions.
You can install Windows on a blank hard drive; on top of an already installed system; or as a second (third, etc.) operating system. Each of these options has its own characteristics. Today I want to tell you how to completely reinstall your existing operating system while formatting the system disk.
In general, you can start installing Windows XP in two ways: 1) by booting from the installation disk; 2) directly from the installed system. The first option is preferable, and we will consider it.
A small digression: I did not take the screenshots used in the article myself. I borrowed them from the site compbegin.ru. I hope the author won’t be offended by me for this :)
So, for installation we need boot disk with Windows XP operating system. Only such a disk contains a special hidden partition with important system files that will allow the computer to boot directly from this CD.
We turn on our computer and first of all go to the BIOS to configure booting from disk. To do this, immediately after turning on, press the key on the keyboard Delete or F2(other keys may also be used, so you need to carefully watch the prompts on the screen).
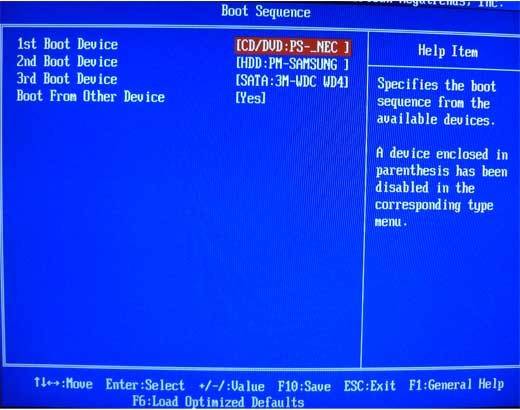
Once in Bios, you need to find the section with the word Boot, and then change the order of boot devices in it so that the CD-ROM is in first place. Depending on the BIOS version, the device from which the computer will boot is either selected from the list or moved to the top using the keys F5/F6, +/-
.
After the changes have been made, we exit the BIOS, saving the settings. Before leaving, you need to insert a disk with Windows XP into the drive so that the computer can boot from it.
If any Windows operating system was already installed on your computer, then after rebooting you will see “” on the screen (this means “Press any key to boot from CD”). Accordingly, you need to press any button on the keyboard. If you wait more than 10 seconds, the current operating system installed on the hard drive will begin loading (then you will have to restart the computer again).  The Windows XP installer shell will appear on the screen. The OS will check the hardware installed on the computer and begin downloading installation files.
  At the end of this process, a window will appear asking you to begin installing Windows. Click Enter on keyboard.
 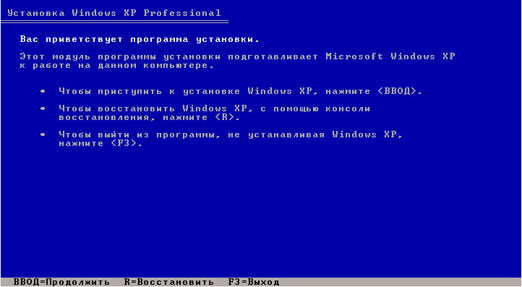 Next, accept the license agreement by clicking F8.
 It will then search for previous copies of Windows installed on your computer. If any are found, you will see a screen with a list of these systems.
  Here you will also be offered:
1) Restore the found copy of Windows by pressing the R key .
Recovery can help if Windows system files are damaged, deleted, or replaced by infected files.
If you select this option, you will have to go through the full system installation procedure, during which all system files of the old copy will be replaced with new ones from the CD. All your data, settings and installed programs will not disappear anywhere.
2) Install a new copy of Windows by pressing the Esc key .
Because we want to install a new Windows XP, then press now on the keyboard Esc.
You will not see a window with a list of installed systems if you are installing the system on a new hard drive, or if the previous copy of Windows has a different edition or service pack.
Because in my case, the operating system was already installed on the computer, and the hard drive was already distributed into logical drives. Therefore, a window appears listing all found partitions.  If the current partition of your hard drive does not suit you, you can delete existing partitions by pressing D(you can select the desired section using the arrows on the keyboard). After deleting a partition, the area it occupied becomes unallocated, and all data located on this logical disk is deleted.
The existing structure of the hard drive suits me, so I use the arrow on the keyboard to select the partition in which the system will be installed. Let it be C: Section2 (SYSTEM). Then I click Enter.
If the following window appears, just click Enter. Then select “Format partition using NTFS” and click Enter.
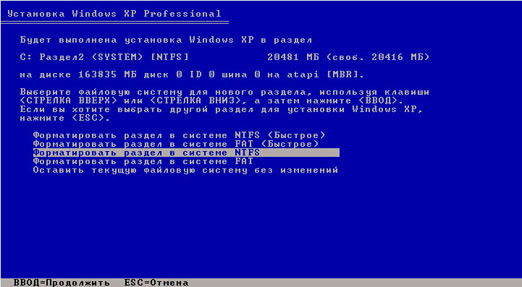 The formatting process will begin:
  When it’s finished, Windows XP files will begin copying to your hard drive:
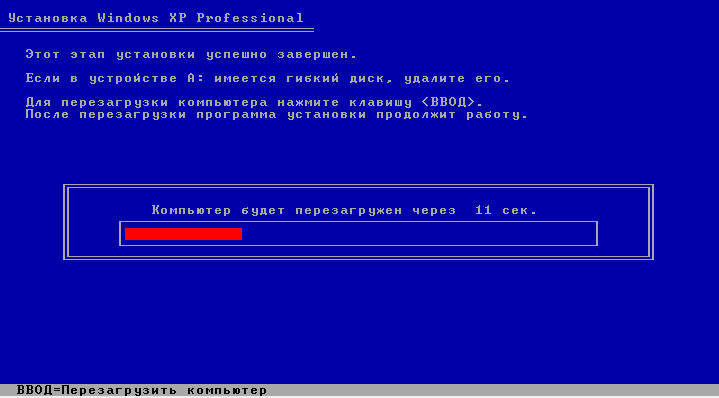
 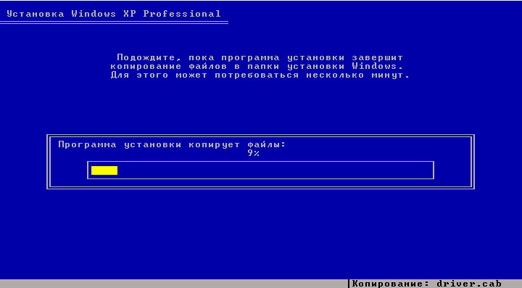 After the copying is completed, the computer will reboot. If after rebooting a screen appears that says “”, do not press anything (just wait 10 seconds). Otherwise, the installation will start again.
Next, Windows will offer to configure the language and region. Click “Next”.  In the “Setting program affiliation” window, enter some name (for example: Ivan) and the name of the organization (for example: Nome). Click “Next”.
  The “Product Key” window will appear, in which you must enter the Windows XP serial number.
 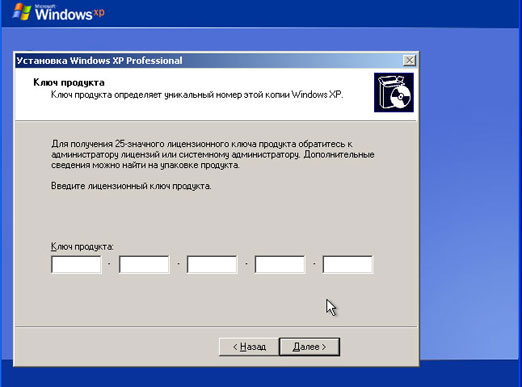 Next, come up with and enter a computer name under which it will be visible on the network (use Latin letters). The administrator password can be left blank.
  In the “Setting time and date” window, check all the settings and click “Next”.
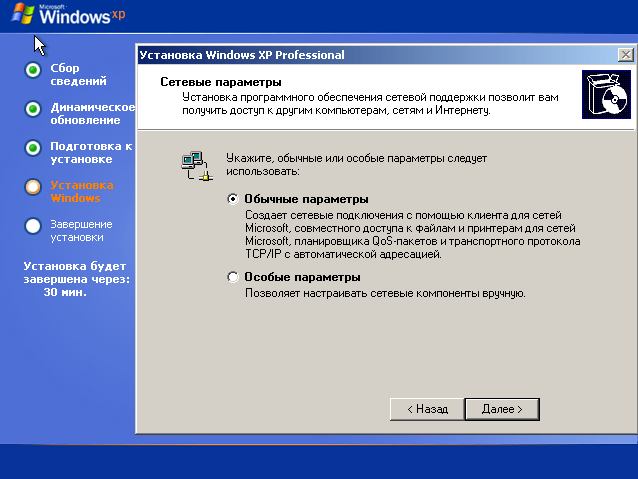
  You will see the next two windows only if the Windows XP distribution contains a driver for your network card. In the first of them, we leave the marker in the “Normal settings” position, and in the second, we agree with the name of the working group WORKGROUP and simply click “Next”.
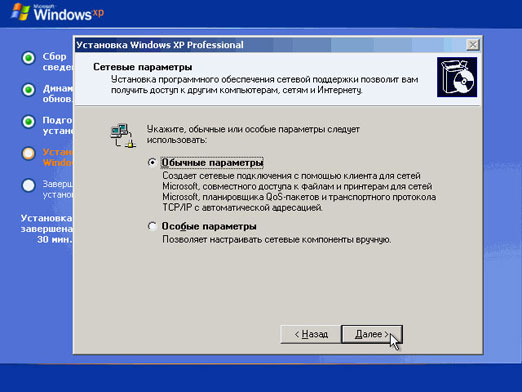
 Windows will then begin setting up the network and copying files. After the installation is complete, the computer will restart and offer to automatically adjust the screen resolution - click “OK”.
  A welcome screen will appear - click “Next”.
  The next window will ask you to enable automatic updates. You can select “Delay this action” and click “Next”.
  If a network card driver was installed during installation, two more windows will appear in front of you. In the first “Test Internet connection” click “Skip”. And in the second, put the marker in the “No, some other time” position and click “Next”.
 The account creation window will appear. In the “Your account name” field, enter any name in Latin letters and without spaces. You can also create a second, third, etc. now. users, but for now one is enough. Click “Next”.
  This completes the installation of Windows XP. After clicking the “Finish” button, the Desktop will appear.
 Do not forget to return the computer to boot from the hard drive in BIOS.
Preparing a disk with a distribution kit is the first stage of installing Windows XP. If you already have such a disk in your hands, you can skip this point, but if you downloaded a system image in ISO format from the Internet, you will need to use special programs (Nero Burning ROM, UltraISO and analogues) to burn it to a CD or DVD.
The Windows XP boot ISO file is a ready-made system image containing a complete set of installation data. It does not require any preliminary preparation, but is transferred to the CD unchanged.
Let's look at the process of burning a Windows distribution to DVD using UltraISO as an example.
- Launch the application.
- Press the key combination “Ctrl” + “O” and open the Windows ISO image that you have prepared to transfer to disk.
- Click on the “Burn CD image” icon in the toolbar at the top or press the F7 key.

- Place a blank or rewritable DVD in the optical drive.
- Make sure that the distribution you need is selected in the “Burn Image” window. Check the “Check” option if you want the disc quality to be checked after burning. Select the appropriate recording speed. Even if your laser drive can write at maximum speed, we recommend choosing medium or low speed. This will ensure good readability of your disk by any drive, including old ones.
- A rewritable disc must first be erased by clicking on the button of the same name, and you can immediately start writing to a blank disc by clicking “Record”.

After 20 - 30 minutes, depending on the speed of the drive, the preparation of the installation disk will be completed. You can move on to the next stage.
How to install Windows XP from a disc the traditional way
Traditional installation is a conventional system installation process that requires active user participation. Most often, Windows XP is installed in the traditional way.
At this stage, we have already prepared everything we need. In order to install Windows from a disk, we only need the disk itself and a computer with an optical drive on which the system will be installed. If you don’t have a drive, you can use an external one that connects to a USB port.

BIOS setup
To boot your computer from a CD or DVD, you need to set the CD-ROM drive as the first boot device in the BIOS Setup settings. To do this, enter the settings menu by pressing the designated key (Del, F2 - F12, etc.) immediately after starting the computer. Which one you can read at the bottom of the motherboard splash screen (displayed on the screen almost immediately after turning on the PC).
Once in the settings, go to the “Boot” or “Advanced BIOS Features” tab - in older versions of Award BIOS. Use the arrow keys to navigate to select the laser drive from the list of devices. In our example it is listed as CD-ROM Drive, but sometimes this list only lists hardware models.

After selecting the desired device, press F10 (option to exit the BIOS menu and save the settings).
Booting from disk and the Windows XP installation process
- Place the laser disc in the drive and restart your PC. System installation begins by loading Windows XP files into the computer's RAM.

- Next, Windows will greet you and offer you the option to continue the installation, exit the program, or restore itself using the recovery console. The second and third points do not suit us.

- By pressing Enter you will continue the installation. The next step will ask you to accept the Microsoft license agreement for using Windows XP.

- Next, select a location on the hard drive for the system partition. Click “C”, which means “Create partition”.

- Let's determine the size of the future drive C. In our example, it is maximum, but you can set anything, preferably at least 10 Gb.

- Now let's look at the list of hard drive partitions and agree to install Windows in one of them by pressing Enter.

- Let's format the new partition in NTFS (quick formatting will suit us just fine).

- And wait until the installer copies the distribution files to the disk.

- Once the copying is complete, the computer will restart.
- The next boot of Windows XP will no longer be done from a CD or DVD, but from a hard drive. This means that the system bootloader has been successfully created and is working correctly.

- From now on, our participation will be required again. Here we will have to specify the default system language, our location and additional languages if needed (although language packs can be installed later).

- Next – your name and organization. The name is required, the organization can be skipped.

- Entering the serial number of the Windows distribution during the installation process is voluntary. You can always enter it later.

- The computer name and administrator password must also be specified now. The name will be suggested by default, but you can change it. The password can be left blank.

- The date, time and time zone are also set at this stage.

- We will not assign special network parameters; let them remain by default.
- Leave the workgroup name as is. You can always change it after installation.

- At this point, the installation is almost complete. Next, the screen will be configured and one or more user accounts will be created, the first of which will be designated as the computer administrator. You will also be prompted to activate Windows XP right now.

But now it’s really almost everything. There are a minimum of settings left - and the system is ready to work.
Automatic installation of Windows XP
Creating a response file using Windows tools
Agree, installing the system for about an hour without leaving the computer and constantly clicking “Next” will get boring for anyone. To simplify this work for those who have to do this often and for a long time, they came up with a way to install Windows without user intervention. To do this, a script is created in advance - a response file, which contains all the information necessary for the installer program.
It's time for you and me to figure out how to create such scenarios. The Windows XP distribution includes a utility Setupmgr.exe, which is in the archive deploy.cab, stored in the SUPPORTTOOLS folder on the installation disk. Let's extract this utility from the disk and run it.
- The “Installation Manager” wizard will help us create the answer file. With its help, we can either create a new or change an existing script. Since we don’t have any preparations, we’ll select “Create”.

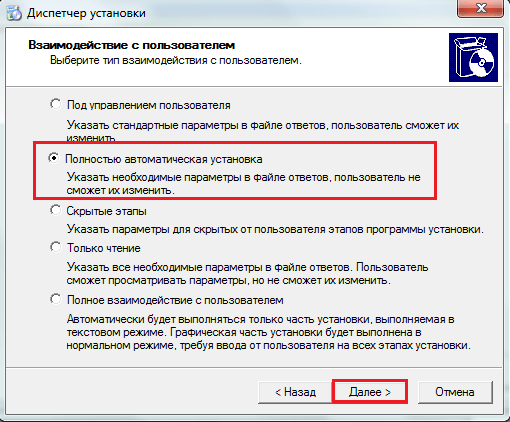
- We will leave the installation type as default – “automatic installation”.

- Product version – Windows XP Professional.

- User experience – “Fully silent installation” (if we do not plan to change the parameters in the answer file).
- Next, select “Install from CD”.

- Let's accept the license agreement and proceed to filling out the same forms and fields that we filled out when installing Windows from disk. First window: “Name and Organization”.

- Screen options. They can be left as default (use Windows defaults).

- Timezone.

- Serial number (required!). Without entering the serial number here, you will not be able to proceed with creating the answer file and installing the system.

- The names of the computers on which Windows XP will be automatically installed using this scenario.

- And also: the administrator password, network components, the name of the workgroup or domain where this PC will belong, the country and city telephone code, locale standards, language support, Internet Explorer initial settings, Windows installation folder, printers and a number of other settings - in separate program windows.
Upon completion of the wizard, a file will be created unattend.txt- this is our script, thanks to which we can install Windows XP completely automatically.
If you install the system from a CD, you need to rename unattend.txt to winnt.sif.
Once you've created your answer file, you can add your own commands to it, which you can learn about in this article.
That's probably all. As you can see, there is nothing difficult about installing Windows XP according to a script without your own active participation. All that remains is to save the resulting file in the i386 folder of the distribution disk - in the same place where winnt32.exe - the Windows installer - is located.
If your PC has a floppy drive, you can place the answer file in the root directory of a floppy disk and insert it into the computer during system installation. In this case, the installer will prioritize executing the script from the floppy disk, even if there is another one on the CD, in the i386 folder.
Automation of installation by alternative means
Windows' own tools are not the only tool that allows you to install it “in one click.” There are also third-party applications for this, for example, Advanced Windows Unattended Installer. Creating scripts using this simple and free program is much faster and easier than using Windows. The only drawback of Advanced Windows Unattended Installer is the lack of a Russian-language interface.
To use this tool to create a disk that allows you to automatically install Windows XP on your computer, you need to perform only three steps:
- Copy the contents of the Windows distribution to a separate folder or mount its ISO image into a virtual drive.
At the turn of the century and at the dawn of the new millennium, the Microsoft development company was more fruitful than ever: a whole series of newly created operating systems of the Windows XP line of various modifications saw the light. Some view this scattering of operating systems as a series of experiments with functionality and interface, with the help of which the company sought to find out the most attractive features, the most popular functions and all the promising directions for the development of this line.
It is difficult to judge to what extent this opinion corresponds to reality, but there is definitely a rational grain in it - after all, Windows XP Professional, which eventually appeared on the market, became the most successful hybrid of all the advantages it inherited from two popular branches, NT/2000 and 9x/Me. Although Microsoft officially canceled support for XP back in 2013, it still remains one of the most popular axes in the world.
On our website you can download Windows XP (in Russian) for free. The 32-bit version with SP3 is available via a direct link (includes Service Pack 3 updates). The version is an evaluation version, which must be registered after a 30-day period or discontinued use.
The new progressive version of Windows XP in Russian, at the time of its release, was quite positively received by users, because it demonstrated high performance and relatively high reliability combined with a well-designed user interface. It was a breakthrough, allowing you to get a wonderful workhorse on basic PC hardware and a full-fledged multimedia entertainment center (depending on the user's tasks).
The creators themselves stated that the new OS interacts optimally not only with ordinary computer hardware - it will become the reference operating system of the Windows family in terms of user interface convenience.

The user will notice the new XP interface instantly - just quickly glance at the new and attractive Start menu and redesigned desktop icons. If previously the key idea of the developers was broad functionality, now we have Windows that is functional and colorful in every sense.
Upon closer examination, you will notice that the previous “robotic” geometry with a predominance of straight segments and right angles has sunk into oblivion, and has been replaced by smoothed and rounded lines that are pleasing to the eye. All this is accompanied by a translucent menu and a large number of animation effects when working with program windows. By the way, programs for XP now work much more stable than with previous versions. And in case you need support for older versions, you can run the program in emulation mode windows 98, 2000 and other releases.
The changes even affected the fonts - ClearType technology made them a little more readable. The design of the new OS has become smoother in its directness and functionality, and thanks to its animation effects, it seems that Windows XP doesn't just obey user commands - it anticipates them.
It is worth noting that all this elegance was not configured and given to the user as is - the system was equipped with additional settings and programs, allowing you to change almost any parameter of a functional component Windows XP What also deserves special praise is that for such “sharpening” you do not need to go into the depths of the system kernel and study reference books as thick as “War and Peace” - everything is much simpler.

Note that transferring settings from one Windows XP computer to another has become even simpler and more straightforward. Once done, setting up the operating system will not require repeating the same steps on other computers or other accounts: a successful option can be freely transferred using the Windows Settings Transfer Wizard. In addition, dramatic improvements have been made to the Plug&Play system, which allows for more predictable and comfortable installation of new equipment, simplifying the search and installation of device drivers.
Windows XP became not just a novelty, it represented a new generation of the popular operating system of the Microsoft Windows family. This version of the OS became a software hybrid, successfully combining the releases of Windows NT and Windows 2000, which have proven themselves to be excellent personal computing systems based on 32-bit architecture. And although the external similarity is very noticeable, the mechanism for managing memory and processor time has undergone significant changes, borrowing only the best solutions from its predecessors.
Operating system releases:
There are three versions of Windows XP on the modern market - Server, Professional and Home.
Windows XP Professional is a well-executed business concept. This is immediately evident from its functionality. In addition, it does not have the restrictions found in the Home Edition, and there are more pre-installed programs:
- Remote Desktop (allows you to connect to a remote Windows computer and work directly with its desktop);
- support for Scalable processor support technology (for multiprocessor systems);
- control and restriction of access at the user level (deprived of the restrictions of the Home release);
- advanced access subsystem Access Control, which allows centralized and predictable distribution of access to resources between users and software services;
- Centralized administration at the domain level is possible with the Centralized administration system.
Conclusion: it is recommended to download and install the Russian version of Windows XP SP3 (32-bit) with the Professional prefix. As for hardware, Windows XP has very modest system requirements: a processor with a clock frequency of 500 MHz, 2 GB HDD, 64 MB of RAM. Although, for comfortable work, the hardware requirements are an order of magnitude higher.
And although Windows XP has long celebrated its tenth anniversary, it still remains a very popular operating system that copes well with all the functions assigned to it, and the stable and reliable kernel continues to satisfy basic user needs when working with popular programs.
It seems why, when almost all owners of desktop computers and laptops have switched to the latest versions of the OS, they need to install Windows XP from a flash drive. But it's no secret that popular netbooks are not equipped with an optical drive for reading CD/DVD discs. But even this is not the main thing. For the most part, netbooks do not support the seven. And installing an earlier version of the operating system will help improve performance. You can also use an external DVD drive, but why buy such an expensive device if you have a regular flash drive. There are several ways to create a bootable flash drive to install XP. This is exactly what we will talk about.
Initial data
To install Windows XP on a netbook, you must first prepare. You will need:
- Flash drive with a capacity of 1 to 2 GB.
- CD or image with the Windows XP operating system.
- Desktop or laptop.
- Distribution for creating a bootable flash drive.
If you are using an OS image, you must unpack it and save all the files in a separate folder.
Format the flash drive
For different tasks and devices, flash drives with a specific file system are used. The same drive will be readable on a computer, but, for example, a DVD player may no longer see it. In a word, for our tasks we need a certain file layout of a USB flash drive. And you can make the necessary drive layout in different ways. Let's consider one of them.
Windows tools
Everything is simple here. To do this, you should perform a certain sequence of actions:

The program will work and reformat the USB device to the desired layout.
Now, to install Windows XP on a netbook from a flash drive, you need to make it bootable. There are several ways to do this.
Create a bootable USB flash drive with WinToFlash
Novicorp WinToFlash- makes it possible to create a bootable USB disk with OS versions such as XP, 2003, Vista, 2008, 7. With its help, you can install Windows from a flash drive to a netbook, laptop or desktop computer. The program's capabilities have been expanded with:
- WinPE transfer;
- destruction of drive data full or quick;
- creating a boot disk from DOS;
- creating a Live CD/DVD flash drive.
Besides:
- it is possible to select a Russian-language interface;
- two modes: wizard mode, which is used to create Windows XP flash drives, and advanced;
- support of the program on the Russian-language website;
- The ortable version allows you to work on different machines;
- The program weight is only 10 MB;
- completely free.
So, let's start creating a bootable flash drive:
- We launch the program and respond affirmatively to all pop-up messages until the working window appears. In wizard mode it will look like below.
 Or in advanced mode it will look like this, shown in the figure.
- We connect a flash drive with a capacity of 1 GB or more.
- The selected XP OS image is unpacked by WinRaR into a separate folder.
- Now, if you click on the large button with a green checkmark in the main window in operating mode, we will go to the preparation wizard. Click Next ›.

- The next window indicates the path to the folder with the unpacked OS image and the path to the installation drive.

- After clicking the Next › button, we accept the Microsoft license and agree to the formatting. Although the official website of the program states that WinToFlash will not display a format message if the flash drive is empty. In our case, we confirm.

- The technician himself will prepare the drive for the next stage.

- Now comes the final stage of creating a bootable flash drive with Windows XP SP3.

When the work of a master WinToFlash ends, you can exit the program. The bootable Flash drive is ready and the next step is installing Windows XP on the netbook.
UltraISO program
Among those Russian users who installed another OS, the program is popular Ultra ISO.
From what this program can do, we can note:
- The ability to correct a CD/DVD image, for example, extract an entire file or folder from it.
- Add or remove a folder or file.
- Create an ISO image of any document.
- Optimizes files to save disk space.
- Supports a large number of image types.
- Creates your own virtual drive and much more.
In addition, the program supports the Russian language and is compatible with such popular emulators as Daemon-Tools And Alcohol 120.
So, for work we need a Windows XP image in ISO format and a flash drive.
Check the contents of the flash drive or all data from it will be erased.
Let's start creating a bootable flash drive, to do this we will perform the following sequence of actions:
- Let's launch Ultra ISO.
- From the top panel, click on “ File" From the drop-down list select “ Open…».
 And we show the path to the folder where the image file of the desired operating system is saved.
- Now you need the “” item from the top menu. Click on the line “ Burn a Hard Disk Image...».

- The program's working window opens. In the line " Disk Drive» select the drive that will be used in the future. There is no need to select the image file, since it is already marked in the second window " Image file" By default, the program creates a flash drive from the " USB-HDD+" It’s better not to change anything, but leave it as it is. This makes it more likely that the boot drive will be recognized by the BIOS of most computers and netbooks as well. In addition, there are very specific BIOSes. Therefore, USB-HDD mode is most likely not suitable for them. There is also no need to format it to the desired file system. Ultraiso will do everything automatically. All that remains is to click the Write button.

- If you forgot, then the program Ultra ISO will warn you that the flash drive will be formatted. Therefore, you need to make sure that important information from it is saved in advance. And in this case, you should agree with the hint.

The process of creating a boot disk for any computer, laptop and netbook will begin.
Setting the first boot in BIOS from USB
Installing Windows XP from a flash drive is the same as from an installation CD/DVD, but you must first set the OS boot priority in the BIOS. To do this, you definitely need a signal from the USB drive. If it is not connected in advance, then it will not be visible in the OS boot options.
Now let's set the boot priority:

After the reboot, the netbook will begin loading the OS from the created Windows XP flash drive.
Errors when installing Windows XP from a flash drive
But the first launch of the installation flash drive is not always successful, and the OS is not installed. We can list the main reasons for resetting the Windows XP installation:
- Hardware conflict when laptop devices are incompatible.
- The storage medium itself is damaged.
- There are no suitable drivers for this hardware.
- Problems with the activator.
- Incorrectly selected program for creating a bootable drive.
- Often the Windows XP installation program from a flash drive fails because it is not formatted correctly.
- Hardware conflict when trying to use a USB 3.0 input, while the installer does not support such port extensions simply because there are no such drivers. And it’s not a fact that if the USB port supports both modes, then the installer will be able to understand it.
Now let's look at whether it is possible to install Windows XP without additional BIOS settings, what errors may occur during installation, as well as ways to solve them.
After creating a bootable drive, it is not always possible to install the OS from it. For example, a situation is possible when the boot device authorization was successful and the drivers are being loaded, but text appears on a blue screen. A little BIOS reconfiguration can help here. In it you need to find the item “ Sata Mode" ("") and change the priority. Instead of " ATA"set priority to " AHCI" Save the changes and reboot. 
If it is not installed again, then you need to return to the BIOS again and in the “ IDE configuration» switch to IDE mode. This problem can arise when installing a system from outdated flash drives for which the system cannot select the appropriate drivers. If such an item is not visible, then most likely a different BIOS version is installed. In this case, find the tab “ Advanced" Let's move on to the line " OnChip SATA Type", where we change the priority from " IDE AHCI" on " Native IDE».
There is another option. On the " Advanced"find the line" IDE Configuration" and in the section " SATA Operation Mode" change from " Enhanced" on " Compatible».
It may also happen that even during the installation stage from the hard drive, the computer suddenly reboots. Setting it back in the BIOS to " IDE mode" Reboot.
Another situation. During installation, the netbook may report: I can’t install, I need the asms file. To solve this problem and install Windows, select the second line in the first message when loading from the window.  And in the selection window - “ First part…" After the files are copied to the hard drive and the netbook reboots, everything is the same, but select “ Second part…».
It may be that a warning appears when booting from a flash drive. In order for the system to install, creating a bootable Flash disk with another program will help solve the problem. For example, you can download and install WinSetupFromUsb.
If the system does not install, the reason may be a hardware conflict. The laptop system itself will display the error code on the screen. 
It may also happen that the installation program displays the message: error code 0x80070017. Reason for failure:
- USB input is damaged;
- unreadable flash drive (error code 0x80070570);
- incorrectly compiled distribution.
Conclusion
When the installation of Windows XP from a flash drive is interrupted by an installation error message on the computer, this is not a reason to panic. It is worth once again carefully repeating all the operations to create the installation flash drive. Read the relevant forums where experts can give advice. In any case, if the problem is not physical damage to the equipment, it is always possible to find solutions.
Video on the topic
It might be useful to read:
- How much does a biglion coupon cost?;
- Protecting a flash drive from viruses: disabling the autorun function Automatically checking the flash drive for viruses;
- How to use the Google Chrome search engine;
- How to change the name of your user folder on MacOS Change username el capitan;
- Free antivirus Bitdefender Antivirus Free Edition Is it possible to download BitDefender in Russian;
- How to make, send and listen to a voice message in Odnoklassniki?;
- 3 optional dynamic list query parameters;
- How to make a font smaller on a computer: tips and tricks How to change the font on a computer using a keyboard;